
Dealer Portal
Origination System for Toyota Material Handling
A step-by-step guide to successfully quote and contract a customer with Toyota Industries Commercial Finance.
Please email: Forkliftdealerportal@toyotacf.com
Use CTRL+G on a PC or Command+G on a Mac to find the next instance of a word.
News and Updates
Account Login and Resetting Password
On successful creation of your profile, you would receive an email notification that would look similar to this example from no-reply@focusodessa.com <No-Reply@focusodessa.com> on behalf of Toyota Industries Commercial Finance (TICF):
1. To access the Dealer Portal, click the URL given in the email. Alternatively, you can also paste the given URL in the browser.
Note: The Dealer Portal can be accessed across Google Chrome, Microsoft Edge, Mozilla, Firefox, and Safari.
2. To log in for the first time, use the Login Credentials mentioned in the email.
3. Check I agree to the Terms & Conditions and click Sign In. With this being your first login, you will be redirected to set a new password for your account.
4. Enter the password provided in the email as Temporary Password followed by a New Password. Ensure that the password meets the requirements mentioned on the screen.
5. To confirm the new password, re-enter the new password and click Next
6. On setting your new password successfully, you will receive the success message.
With the new password now set, you can log into the Dealer Portal.
1. Enter your username and the newly-set password.
2. Check I agree to the Terms & Conditions and click SIGN IN.
• Once you have logged in to Dealer Portal, a Multifactor Authentication Code (MFA) will be sent to your email address to complete logging in.


You’ll receive an MFA Code for Dealer Portal Access for authentication. Enter the emailed MFA code and continue.

Reset Your Account Password
In case you forget your password and cannot sign in from the Login Page of the Dealer Portal, you can choose to reset your password.
To reset the password for your account, perform the following steps:
1. Enter your Username (Registered Email ID) and click Next. This opens the Forgot Password window.
2. On the next login page of the Dealer Portal, click “Forgot password?”
3. Click RESET PASSWORD.
4. You will receive the temporary password confirmation email.
5. Now, access the Dealer Portal URL.
6. Enter your Username and the Temporary password provided in the email.
7. Next, select I agree to the Terms and Conditions checkbox.
8. Click Sign In. This opens the Reset Password window.
9. Enter the password mentioned in the email as Temporary Password followed by a New Password. Ensure that the new password meets the requirements mentioned on the screen.
10. To confirm the new password, re-enter the new password
11. Click RESET PASSWORD.
12. On resetting your password successfully, you will receive the confirmation success message.
13. Click LOGIN NOW and enter your Username and the newly-set Password.
14. Check I agree to the Terms & Conditions and click SIGN IN.
Create Applications
• Create Application: Click Create Application. This action navigates to the Create Application page.

The section below displays active contracts and deals funded.
Active Contracts: Displays the total number of active contracts.
Deals Funded: The deals funded text displays the details of funding for the dealer. This does not only include the applications, but it also includes contracts which are stand-alone (stand-alone contracts with the origination source as the Logged in Dealer). Here, the displayed amount is the amount that is fully funded plus all the other partially funded amounts. If there is more than one currency involved in the deal, then through the View more option, you can view all the other funded amounts on the tooltip as well.

Application In-Progress
The adjacent section displays Applications in-progress details:
• Total Application: The chart displays total number of applications submitted.
• Application Status: The displayed statuses are Awaiting Funding, Credit Approved, Credit Review, Funded, Incomplete, and Submitted.
• Filters: There are two filters common with Application In-Progress. One is the Schedule filter. The data can be displayed on weekly or Monthly basis. Next to it is Currency filter. Currency filter comprises all the currencies associated with existing contracts. So if you choose CAD, all the contract with CAD are displayed here.
Note: The user can deselect filter anytime.

Application grid-view
The Application grid-view displays Application Number, Date Submitted, Customer Name, Product Type, Product Application Type, Requested amount, Approved Amount, Requested Amount, and Approved Status. Only top 5 applications are displayed in the grid-view. But the user can use Filters to view desired application details.
View Applications
The Dealer Portal allows you to view all your Total Applications and Summary in one single place. To access, navigate to Applications > View Applications from the main menu header. This opens the Applications tab that provides you with a list of applications that are applicable to you.

For each listed application, you can view the following information:

The Export option will export applications based on Search and Filter Criteria.
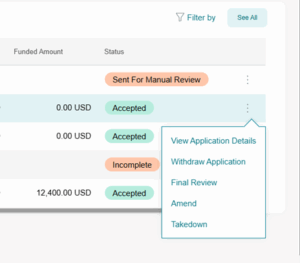
For active applications, there is a drop-down menu with options, View Application Details, and Add Documents.

Note: An error may appear when exporting or downloading data from the Dealer Portal using Export to XLS or Export to CSV. Depending on your browser, you may need to adjust your download settings or contact your Dealership’s IT department.
Withdrawing Application
If required, an application can be withdrawn. When an end-user clicks Withdraw Application, then as per set validations, the system displays a validation if the application falls under following categories:
• The application cannot be withdrawn if one or more contracts associated with the application are funded or commenced.
• The application cannot be withdrawn if the New Credit Application is in progress mode.
• The application cannot be withdrawn if it is in any of the following Statuses in Lessor Portal: Inactive, Withdrawn, Approved Not Accepted/Declined All Lines or Completed
If the application does not fall under any validation category, then follow the steps below to withdraw an application:
1. Click Withdraw Application from Home Screen then click on the three dots edit to the right of the application, use the drop-down list. This action opens Withdraw
Application window.
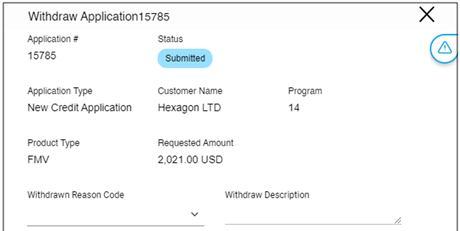
2. Select the Withdraw Reason Code from the drop-down list followed by entering Withdraw Description.
3. Click Withdraw Application
4. The system displays the Confirm message asking if the user really wants to Withdraw application.
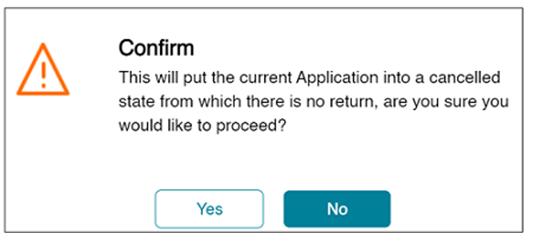
5. Click No, if you do not want to withdraw the application.
6. Click Yes to continue. The status of the credit application changes to Withdrawn.

Viewing Application Details
Click View Application Details to view the application details. This is a View only and you cannot edit in this selection.
Dealer Portal Home Page Menu
Dealer Portal provides quick access with an easy view of the status of your portfolio. The menu can be accessed by clicking Home, and you can navigate to the menu as shown below. This provides relevant information regarding your portfolio.
![]()
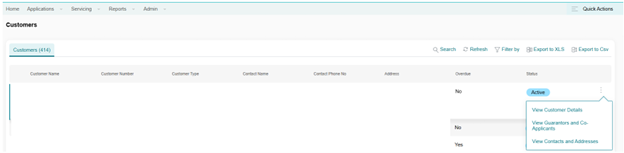
Within the Servicing Tab, you can select Customers.
Customers
Once Customers is selected, you can view the following:
• Customer Name
• Customer Number
• Customer Type Customer Phone No.
• Address Overdue
• Status
• View Customer details
• View Guarantors and Co-Applicants
• View Contracts and Addresses
Service Request
A service request from the Dealer Portal perspective is to raise a ticket for any activities or transactions that a Portal user is unable to perform. In the Dealer Portal, the dealer can raise a Service Request to complete those service requests that are initiated by the dealer. For example, a Dealer Portal user can submit a Service Request to add a new location, request a payoff, etc.
Dealer Portal – Service Request
From the menu pane, access Servicing> Service Requests. This action opens the Service Requests window. Additionally, you can also open it from the Quick Actions menu available on the right side of the Dashboard.
Open Service Requests
The Service Request window displays the total number of open Service Requests. The open Service Requests are those request that are raised and under process, but yet to be completed.
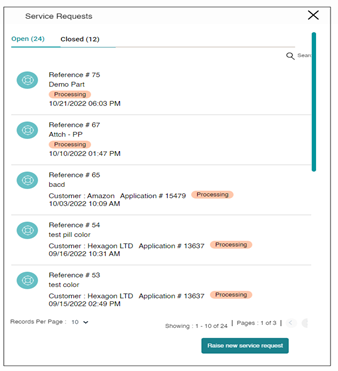
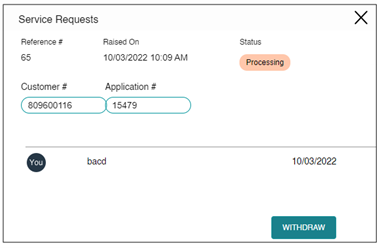
Double click the Service Request to view details. This action opens the Service Request window. The Service Request window displays the Reference number, Raised date and Time, current Status, Customer number, Application number, and Summary details.
Closed Service Requests
The Service Request window displays the total number of closed Service Requests. The closed Service Requests are those request that are completed and closed for various reasons, such as cancelled.
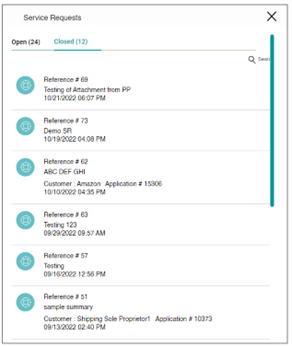
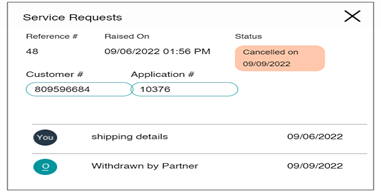
Double click the Service Request to view details. This action opens the Service Request window. The Service Request window displays the Reference number, Raised date and Time, current Status, Customer number, Application number, Summary details, and Description.
To Create a Service Request
1. Hover over Servicing Menu or Quick Actions and click Service Requests. This action opens the Service Request window.
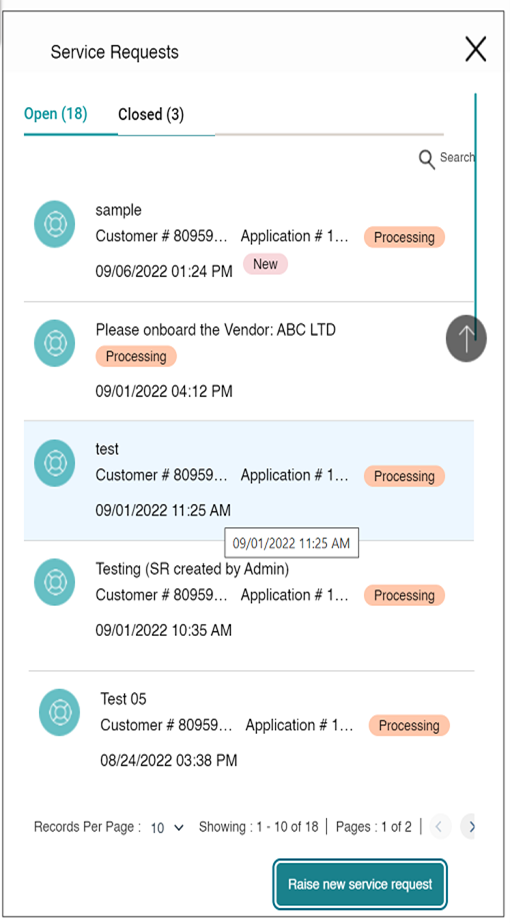
2. Click Raise New Service Request. This action opens the New Service Request window.
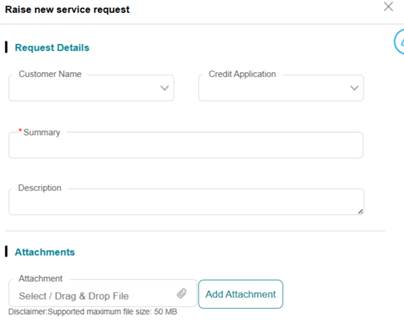
3. Enter following details in New Service Request window.
a. Customer Name: Select the Customer Name from the drop-down list. This is an optional field.
b. Application #. If required, select the Application number from the drop-down list. This is an optional field.
The fields Customer name and Application are optional fields. That means a portal user can always go ahead and create an open-ended service request not linked to any kind of entity. But if a portal user wants to go ahead and create a service request towards a specific customer or a specific credit application, they can go ahead and do so. Summary: Enter the service request summary. This field is mandatory.
d. Description: If required, enter Description.
e. Attachments: If required, you can attach a document/image for reference. Select/drag and drop file from your system and click Add to attach the documents. You can add multiple reference documents in the form of attachments. And this also supports any file extension such as image file or PDF file.
f. Click Cancel if you do not wish to raise a service request.
g. Click Submit to continue.
The system displays the success message that service request raised successfully.

h. The request created is displayed on the Service Requests window along with the status of the request.
To Browse for a Service Request
1. To search for a generated Service Request in the Dealer Portal, double-click the required Service Request in the Service Request window and copy the **Reference **number.
2. Next, under Activity Request, select the search parameter as Activity Request number and enter the Reference number. The Service Request details are displayed in the list-view.

To Withdraw a Service Request
If required, a Service Request can be withdrawn for various reasons.
Note: You can withdraw only pending or processed Service Requests. The Service Request with closed status does not have the Withdraw option.

1. Click Withdraw to withdraw a Service Request.
2. The system displays the warning message.
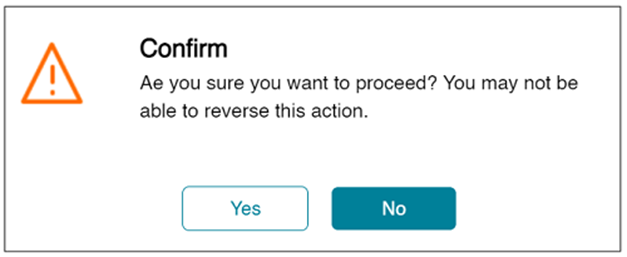
3. Click No if you do not wish to withdraw the Service Request.
4. Click Yes to withdraw the Service Request.
5. The withdrawn Service Request appears in the Closed Service Request list.
Assets
Once selected Assets you can view the following:
• View Assets
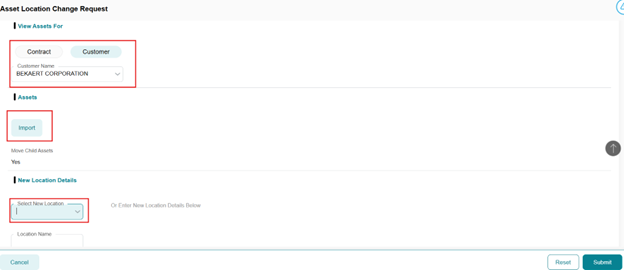
• Location Change Request
• View Assets

• Location Change Request
• In the bottom right you will select New Request.
• A pop-up screen you will appear. Select a Contact or a Customer. Related assets and address will be linked to the Contact/Customer.
• Import Assets in the Assets section you will import the individual asset that is changing.
• Tab to Select New Location Details. Existing customer locations will show. If it is a New location – Enter New Location Details – Add Location Name and Address along with the Effective Date.
• Click Submit.
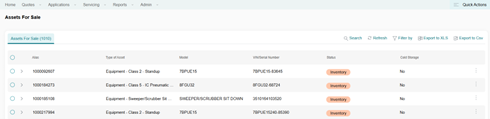
Assets for Sale
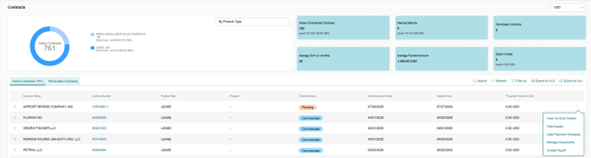
Contracts
Once Contracts are selected you can view the following:
• View Contracts
• Detailed information can be found within the three dot edits when drilling down for information.
• Contracts are highlighted in blue. Double click on viewing.
View Contracts
 Manage Payoff Quotes
- This feature is currently under construction and will be available soon. To obtain a payoff please submit either a Service Request within the Dealer Portal or submit an email to Customer Service.
Invoices
Once Invoices are selected you can view the following:
• Dealer Proceeds: The Invoices section allows you to view the status of your dealer proceeds status.

Reports
The Dealer Portal facilitates generating reports. You can also save the generated report as a template. This template can be used in the future to generate reports or schedule report generation. You can generate a report for Contract and Asset By Contract. The Reports module includes the following sections:
Report List
Generating Asset by Contract report
The Asset by Contract report lists the details of the assets for a particular contract. To generate a report for Asset by Contract, perform the following steps:
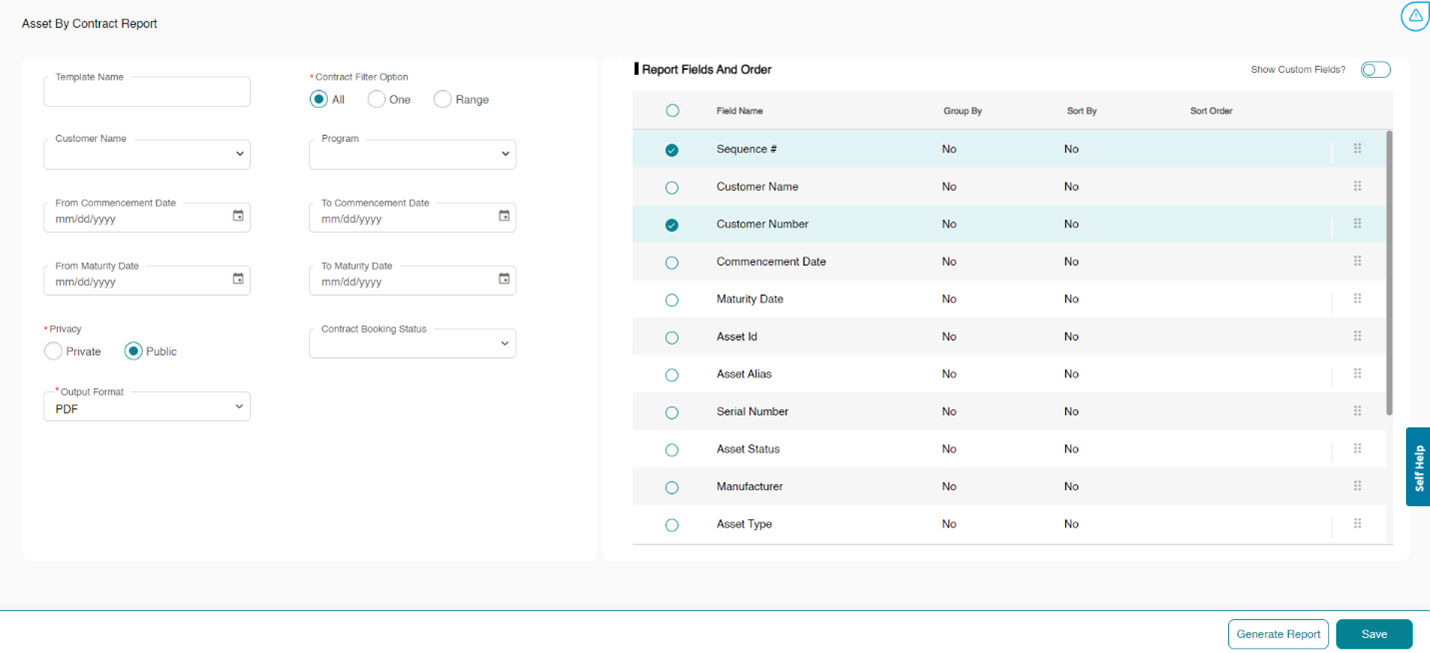
1. Hover over Reports > Report List and click Asset By Contract Report.
2. Optionally, enter the Template Name in case you wish to save the report template for future use. You can generate a report without saving the template for it.
3. In the Contract Filter Option field, choose if you wish to view the report for all available contracts (All), a specific contract (One), or a set of contracts (Range).
All
1. Optionally, you can further choose to enter information for the following filters:
• Customer Name: Select the Customer Name from the drop-down list.
• Program: Select the Program from the drop-down list.
• Contract Booking Status: Select the Contract Booking Status from the drop-down list.
• Commencement date range: Select the From Commencement Date followed by To Commencement Date.
• Maturity date range: Select the From Maturity Date followed by To Maturity Date.
2. Select the Report Privacy as required.
• Private: Generated Report/Template would be visible only to the person who created it and portal admins.
• Public: Generated Report/Template would be visible to all Dealer Portal users
3. Select the Output Format of the report.
4. Select Show Custom Fields if you wish to add the custom fields to the report.
5. Select the fields which should be included in the report.

Note: In case you choose to generate a report for a specific contract (One), then select the Sequence # for which you wish to generate the report. For a set of contracts (Range), select the From Sequence # followed by selecting To Sequence #.
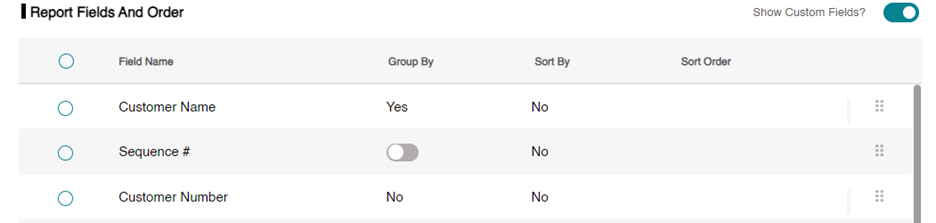
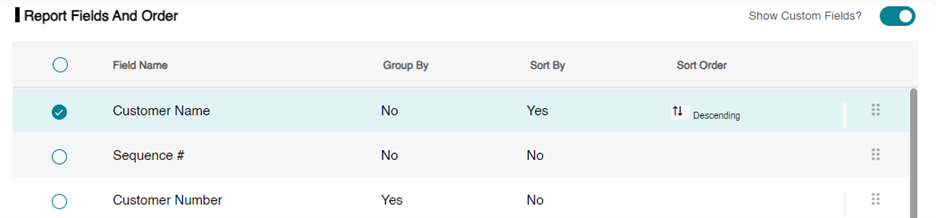
To Group Similar Groups Together
Using the Group By option, you can group similar field values together. For example, if you wish to group the data using the Commencement Date field, then all the contracts having the same commencement date will be grouped together. Perform the following steps to use Group By option.
1. Select the Field Name using which you wish to group the data.
2. You can group the data in the report using one field only.
3. Click No and select the toggle button to turn it on.
4. Click anywhere outside the Group By column to see the change in value. The value of the Group By for the selected field turns to Yes.
To Sort the Report in Ascending or Descending Order
The Sort By option allows you to sort the report in ascending or descending order. You can sort the report using one field only. Perform the following steps to use Sort By option.
-
Click No corresponding to the field using which you wish to sort the report.
-
Select the toggle button to turn it on.
-
Click anywhere outside the Sort By column to see the change in value. The value of the Sort By for the selected field would turn to Yes.
-
In case you also wish to sort the report in descending order, click Ascending in the Sort Order column and select the toggle button to turn it off. By default, the report would be ordered in ascending order.
Note: If the toggle button is turned on, it indicates that the data would be ordered in ascending order. Alternatively, if the button is turned off, the data would then be ordered in descending order.
-
Click anywhere outside the Sort By column to see the change in value. The value of the Sort By for the selected field would turn to descending.
6. Optionally, click Save if you wish to save the report template for future use.
7. Click Generate Report to generate the report.
8. Upon successfully generating the report, you receive the following success message.

9. The generated report automatically opens in a new browser tab from where you can download the same.
Contract Report
The Contract report lists the details of a particular contract. To generate a Contract Report, perform the following steps:
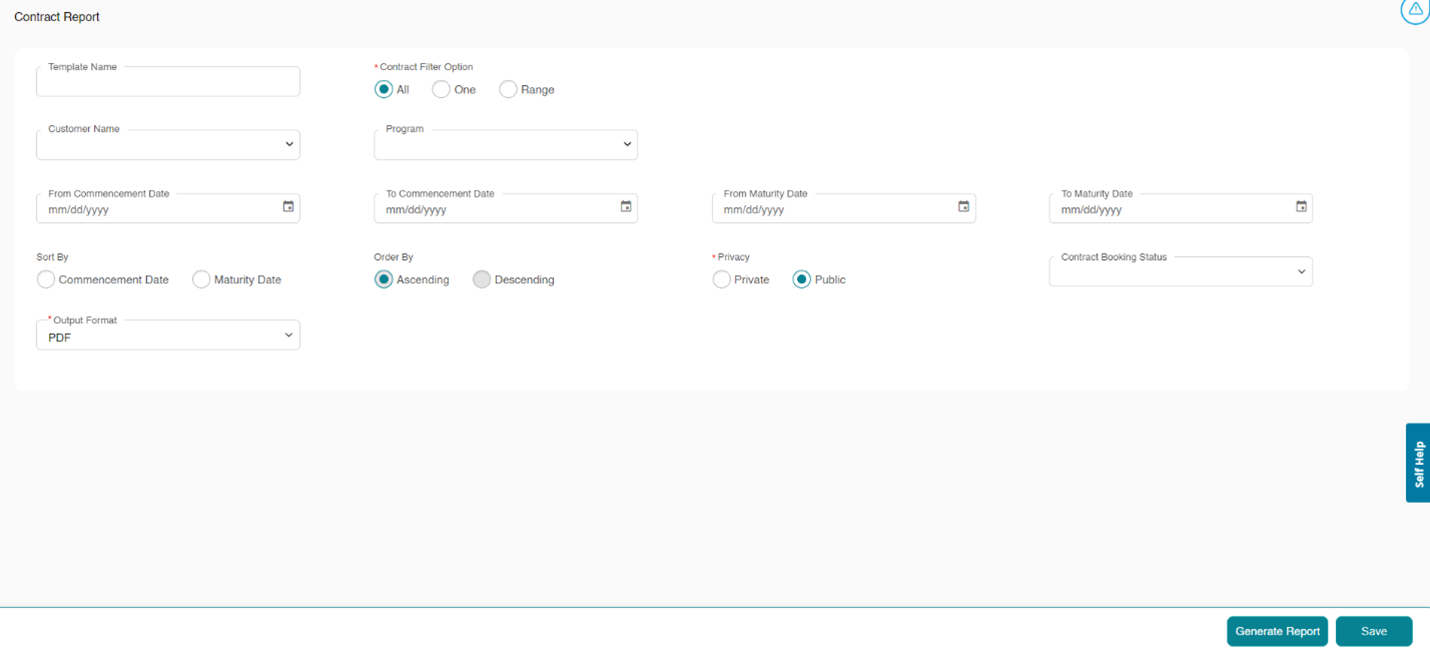
1. Hover over Reports > Report List and click Contract Report.
2. Optionally, enter the Template Name in case you wish to save the report template for future use. You can generate a report without saving the template for it.
3. In the Contract Filter Option field, choose if you wish to view the report for all available contracts (All), a specific contract (One), or a set of contracts (Range).
All
1. Optionally, you can further choose to enter information for the following filters:
• Contract Booking Status: Select the Contract Booking Status from the drop-down list.
• Customer Name: Select the Customer Name from the drop-down list.
• Program: Select the Program from the drop-down list.
• Commencement Date Range: Select the From Commencement Date followed by To Commencement Date.
• Maturity Date Range: Select the From Maturity Date followed by To Maturity Date.
• Sort By: Select the option as Commencement Date or Maturity Date.
• Order By: Select the option as Ascending or Descending.
2. Select the Report Privacy as required.
• Private: Generated Report/Template would be visible only to the person who created it and portal admins.
• Public: Generated Report/Template would be visible to all Dealer Portal users.
3. Select the Output Format of the report.
Note: In case you choose to generate a report for a specific contract (One), then select the Sequence # for which you wish to generate the report. For a set of contracts (Range), select the From Sequence # followed by selecting To Sequence #.
4. Optionally, click Save if you wish to save the report template for future use.
5. Click Generate Report to generate the report.
6. Upon successfully generating the report, you receive the following success message.
7. The generated report automatically opens in a new browser tab from where you can download the same.
Report Template
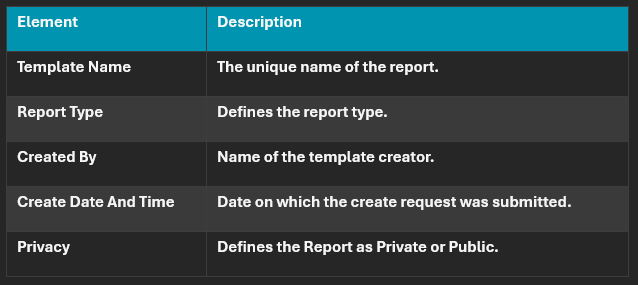
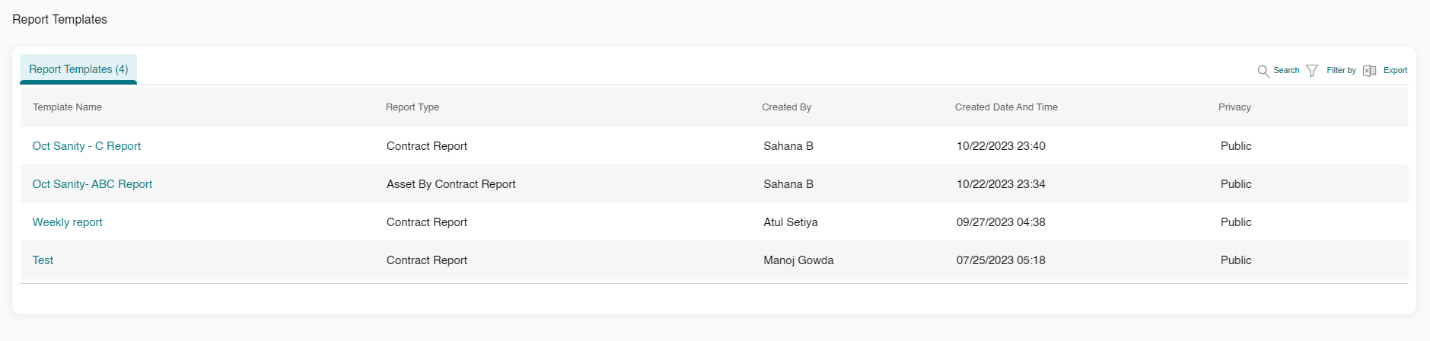
The Report Templates page displays the report templates created by you in the past. To view the report templates, hover over Reports and click Report Templates. For each listed report, you can view the following set of information.
To edit the report template, perform the following steps:

1. Click the template name.
2. Edit the editable fields as required by you.
3. Optionally, click Save if you wish to save the report template.
4. Click Generate Report to generate the report.
Report Scheduler
The Report Templates page displays the report templates created by you in the past. To view the report templates, hover over Reports and click Report Templates. For each listed report, you can view the following set of information.

To edit the report template, perform the following steps:
1. Click the template name.
2. Edit the editable fields as required by you.
3. Optionally, click Save if you wish to save the report template.
4. Click Generate Report to generate the report.
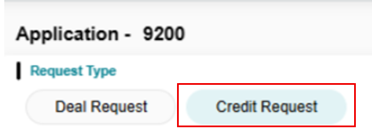
Create Credit Request Application
After you select Create Application, Credit Request (Line) select a customer type, New or Existing, to proceed.
Select Credit Request
By default, the system selects “Use Customer Line” if the customer has an active credit line.
After you select Create Application, Select Request Type as Credit (Line) then you will select a customer type, New or Existing, to proceed.
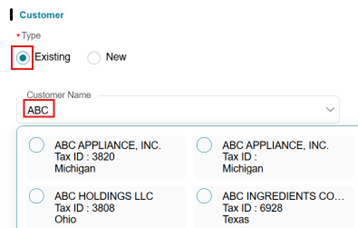
Selecting an Existing Customer:
• Type the customer’s name; matching records from your portfolio will appear.
• When searching for a customer, asterisks may be used as a wildcard. *al for Allied Welding, INC.
• Select the desired customer name with a correct Tax ID.
• Verify Existing Customer data.
• Customer Name and Tax ID change will require a Service Request.
For a new customer select the New Customer button.

Steps to Create a New Customer:
1. Complete the required customer credit information fields.
• Fields marked with a red asterisk (*) are mandatory and must be filled out to proceed.
2. Enter the relevant customer information:
• For company, enter Legal business name, Tax ID, State of Incorporation and Business Type.
1. The TAX ID Field will not be editable until the address is filled out.
• For individuals, you will be required to enter their full legal name, date of birth and SSN.
• NOTES and TIPS: As designed you will need to ADD an address before you can enter the Tax ID.

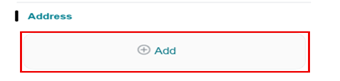
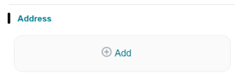
Adding a Customer Address
Steps to adding Customer Address:
1. Click “Add” which opens the address screen. You can add both the main address and the billing address, or separate the Billing Address, if known.
2. For the application the Main address should be the company’s Registered Address.
3. If the Billing Address is different from the main address.
Deselect the Main Address checkbox. Complete the main address and click “OK”.
Add the billing address now by clicking, “ADD” new address and enter the billing address as needed.
a. Adding a Billing Address is not required for application submittal.
4. Click OK and the added address should appear in the address section.
• When “Credit Request” for a new line of credit was selected:
• Instead of a program selection, a Credit Line section will be displayed at the bottom left of the page.
• Enter the requested credit line amount in the designated field.

Scroll down to the Country: Country must be selected from the drop option as is required.

Proceeding to the Next Step
• Once you have made your finance program selection, click “Proceed” at the lower right of the screen to continue to the Guarantors and Co-Applicants section of the application.
![]()
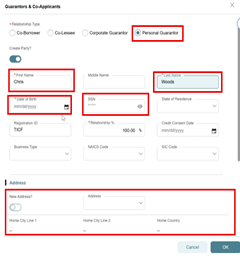
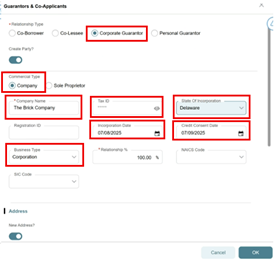
Adding a New Guarantor
• You will add a new guarantor by clicking the “Add” button.
• Personal Guarantor Notes:
• Personal Guarantor – Add an address prior to inputting the SSN.
• SSN Format: Example, 123-12-1234.
• Check Business Type: Individual would be selected.
• Date of Birth.
• Select Address
• Cross Corporate Guarantor Notes:
• Cross Corporate Guarantor – Add an address prior to inputting the Fed Tax ID.
• Tax ID Format: Use the 12-345678.
• Complete State of Incorporation.
Preview Tab
• Once you are on the Preview Tab, review the information for accuracy and select Submit To Credit.

Confirmation will be received stating, your Application for a new Credit Application has been submitted.
A confirmation message will be displayed.
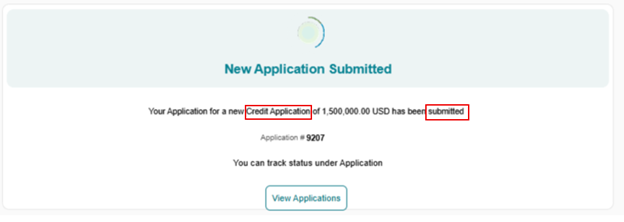
Verification of Credit Decision Letter is located in the Documentation Tab.
NOTE: Once you have your asset information a Deal Request will need to be submitted to draw down on the credit line. The Deal Request will be automatically approved if the customer has credit availability.
Easy Button Lease-Loan Credit Application
Creating an Application Using the Easy Button
Creating Credit Application
You can create a credit application in two ways:
1. From the Home Screen – There are two ways to start a credit application.
a. Click the blue box option to start a new credit application.
b. From the Applications Menu – Located on the Dashboard.

The system defaults to Deal Request.

Once started, the credit application number is displayed in the top left corner of the front page for easy reference.

For TMH CPQ Quotes “Easy Button” Submittal – Pulling TMH CPQ Quote
The Pull Application field (also known as the Easy Button) allows you to quickly retrieve application details from your CRM quote.
Steps to Use the Pull Application Feature:
1. Enter the Opportunity Number from the Toyota CPQ Worksheet and the Sort ID.

2. Click the Add button.

3. After you Add your opportunity, you will scroll down to the bottom of the page and Select Program in the lower left side of the application page:

4. Select the desired Opportunity ID or if you have multiple Opportunity IDs (Optional) for the same customer repeat step 1 and 2 to Add those opportunities. You can remove any by clicking the trash can icon on the line item.

5. Once selected click Pull Application.

6. Review Customer Type: The system will select New or Existing based on your opportunity.
• IMPORTANT NOTE: The first time you pull a CPQ number it will show as a NEW Customer.
-
-
- If New, you will have to input the Fed Tax ID, State of Incorporation and Business Type
- Please note: If you are selecting a Loan, you will also need to change the Line of Business to Equipment Loan.
-

7. Review Address and Contact sections: Please update these with relevant information if necessary.
• You can only have one Main address and this address should be the customer’s registered address.
-
-
- If the Billing Address is different from the existing address you will need to add a new address by clicking the Add button, once the add button is selected select the Billing Address check box.
-
• Adding a Billing Address is not required for application submittal.
8. Adding Customer Contact Information,
• Adding Customer contact with Name, Phone number and Email is required for funding. You will also need a contact for use of the Dealer Portal Docusign documents as you move forward.
• Helpful Hint: To add a contact to the account after submitting application, you will need to raise a Service Request to TICF.
• Click Add to add the contact. This action opens the Add New Contact dialog box to allow you to complete the address information.

• You can now add Contact Types for the customer. Use the Import button to select the Contact Types to allow you to identify the Main, Billing, Collections and Documentation contacts . Click OK to save contacts.


Once imported please Review the imported customer details and if this is accurate, click Proceed button. After selecting Proceed, you will be taken to the Guarantors & Co-Applicants Tab.
Guarantors & Co-Applicants Navigation Buttons

This section deals with cross-corporate guarantors or personal guarantors.
Using Existing Guarantors
• If the customer has existing Guarantors, previously used guarantors will default to the new application.
Adding a New Guarantor
• Add a new guarantor by clicking the “Add” button.
• Personal Guarantor Notes:
• First Name and Last Name
• Date of Birth, Address and Country
• Personal Guarantor – You will need to Add an address prior to inputting the SSN. Use the following format 123-12-1234
• Select Business Type as Individual
• Add Contact information: E-Mail and phone number then click OK
• Click Proceed Button
NOTE: Executed Credit Application is required to be uploaded within the documentation section .
• Cross Corporate Guarantor Notes:
• Cross Corporate Guarantor – You will need to add an address prior to inputting the Fed Tax ID.
• Select Business Type
• Complete State of Incorporation
• Add Contact information: E-Mail and phone number then click OK
• Click Proceed Button

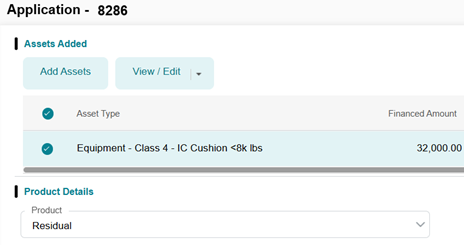
Asset Navigation Tab

The Asset section will appear when you use “Deal Request.” This section is where you will add equipment to the credit application.
Auto-Populating Asset with the Easy Button
• If you used the Easy Button, the system would automatically populate the assets on this screen.
• Verify the asset information, either double click within the asset box or use the pencil or click the three edit dots next to the asset line item on the far right. The fields below need to be reviewed:
• Model year needs to be added
• Annual Usage field is required for all leases and loans, however Overage Rate can be listed as $0 on $1.00 options and loans
• Maintenance is to be added, if applicable
• Equipment Address location: Best Practice is to use the pull-down button to view addresses by the Location Code number. Verify that it is accurate. If it is not correct, the Equipment Address can be created.
- Local Modifications will be added as assets that you will have to serialize. You can delete these items. If deleted ensure that you add the pricing to the parent asset. If there is not an adjustment/increase made to the parent asset there will be a shortfall in funding.
• In addition, you can split the assets with Duplicate Asset link and create new structures as shown below. Please note, the Duplicate Asset function will only be used as needed.
NOTE: When you Duplicate an asset, you will need to click View/Edit and in the 2nd pop up screen, you will need to update the Asset Alias.

• As a BEST practice, the Asset Alias Number is a unique identifier. As assets are duplicated an alphabet character is to be added to the end. As shown below.
Before: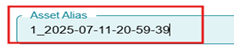 After:
![]() Once updated you will proceed to the Structure Tab.
Once updated you will proceed to the Structure Tab.
Click Proceed button.
• Telematics: If your lift has MyInsights Telematics please ensure that you are checking the Telemetry.
Note: Please note that MyInsights terms cannot exceed the financing terms of an operating lease.”

Structure Navigation Tab

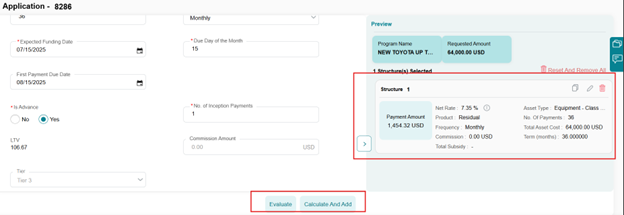
The Structure Tab allows you to review assets, enter deal structure details, and choose a Finance Structure from the Product Details section.
• NOTES and TIPS: Each asset type must have its own structure within an application. Multiple assets are permitted (within the same asset type) on the same application, but each unique asset type will need its own structure. For example, you can add different types of New Toyota assets in the same application but cannot have a New Toyota and Non-Toyota on the same application due to the Program specifics.

• If you have additional asset types, or different programs to include, you will need to create a new application.
Selection of Structure
The structure will automatically populate as reflected below.

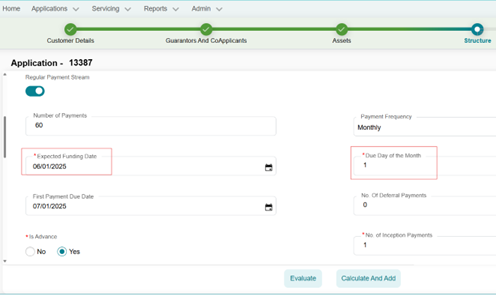
• Pricing your Structure: To price your deal you need to select the Number of Payments, Payment Frequency, Expected Funding Date.
• Expected Funding Date is required for pricing. Best Practice: is to default to today’s date (date of credit application). If the Tab key is utilized the Due Date of the Month will automatically populate.
• Due Day of the Month is required. Best Practice is to default to the same day as the Expected Funding Date. Ex: Expected funding date is the 5th, due date is the 5th.
• First Payment Due Date: The first payment is expected to be 30 days from the expected funding date. It is used for pricing and is auto populated.
• No. of Inception Payments- Leases defaults to 1 representing the advance payment. There is no need to change this field.
• Is Advanced: Yes or No Buttons. You can choose Advance or an Arrears structure. Leases default to Advance and Loans default to Arrears.
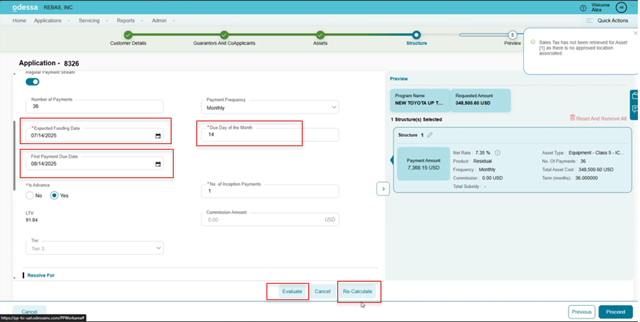
Once the data entry has been completed, Click on Evaluate and Re-Calculate Buttons to obtain your pricing, then click Proceed.
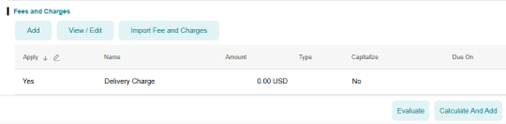
Fees and Charges
Fees and Charges (See the Fees and Charges section): The Import Fees button is where you add any desired Document fees. There are many fee categories that are possible to import. Select the fee type and click Ok.


Select the Add button and complete the pop-up screen for the specific fee. Add additional fees as needed. Your fees will be added to the application and capitalized depending on your selection.

After all options are entered, you must click “Evaluate” button and then Calculate/Re-calculate Button to Calculate your payment and process the structure.
Non-Capitalized Fees and Charges If the fees are billed to the customer (not capitalized) please select
• Receivable Only
• Occurrence Type-One Time
• Refrain from checking Capitalize
• Select Due Date Option – First Rental Payment Date
• Manually input Fee Amount

Deleting Non-Capitalized Fees and Charges please follow the steps below:
Within the Fees and Charges of the Structure tab, select the Apply button, click the Evaluate button.

Once the Fees and Charges have been deleted the fees will reflect in red as shown below.

You have now successfully added and deleted Fees and Charges.
Changing the Residual
If you need to change your residual, follow the process below in the Amend process.
The residual will need to be updated while in Documentation Stage as necessary.
The BEST practice is to complete this in the Final Review in Documentation Stage because the Residual structure may change due to edits within the Structure of the Asset Tab.
• Helpful Hint: The residual is frequently different between TMH’s CPQ and TICF pricing. Please edit the Residual at the Parent Asset level, double click the asset that is being edited to open a separate Asset pane or select the three edit buttons on the right to view/edit.
• Entering an amount higher than the program residual will yield a Dealer Guarantee and an amount lower will increase the customer expected payment.
PLEASE NOTE: If you change the Customer Expected Residual, when you return to the main screen you will only click the recalculate button. If you do select the evaluate button the structure will reset to the prior structure without your residual change. To correct follow the 2 steps above.

- All new applications or new customers will not have tax associated within the structure until the address location is approved. This is part of the credit approval process.
- Helpful Hint: On all new addresses you must recalculate after approval prior to completing documents. If tax is upfront for an address, it will not be included unless you recalculate.

Adding Another Structure to the Credit Application
If you need to add a new structure for a different asset type, click “Add New Structure.”

This will take you back to the Structure Module, where you can follow the instructions above to enter details for the new asset type.
After creating a new structure, follow the same steps to get your payment and Evaluate & Re-Calculate to Add.
Additional Details
You can also enter additional details such as cash down or trade amounts.
To view/add a Purchase Option. Select the structure you need to edit. Then click View/Edit or use the three edit dots on the desired structure or select the pencil icon to edit and add a Purchase Option.
A separate Add Asset screen will pop up to edit the Purchase Option, Margin (increase by dollar amount) Mark Up (increase by rate), Delivery Date, Residual or a maturity/balloon payment. Click OK.
Purchase Option: When adding a Purchase Option submit the total sum of all purchase options. Ex: If you have 3 units at $1.00 option you will complete this field with $3.00. This gives you a purchase option per asset.


PLEASE NOTE: If you change the Customer Expected Residual or Add Margin, when you return to the main screen you will only click the recalculate button. If you do select the evaluate button the structure will reset to the prior structure without your residual change. To correct follow the 2 steps above.
Preview Tab
• The last step is Preview page which allows you to review and submit the credit application.
• Navigate using the button on the lower right if you need to go to a previous stage.
Review prior to Submittal
You can edit the asset information prior to the credit submittal. It is important to upload Documents prior to submittal. Please follow the steps below.
Adding Comments
As needed you can add comments.
To do this there is a pop out box on the right hand side of the screen
1. Click on the Comment Icon located on the far right of the application screen.
2. A Comments Box will appear. Click “New Comment.”
3. Choose the Comment Type from the drop down menu.
4. Enter a Title in the Title Box.
5. Write any necessary comments in the Body Field.

Adding Documents
As needed you can upload relevant documents such as Signed Applications and other financial information if applicable to the customer.
To do this there is a pop out box on the right hand side of the screen named Document List.
6. Click on the Document List located on the far right of the application screen.
7. Click the Add Document Type on the far bottom right of the application screen.
![]()
8. Click on the radio button to Select supporting Credit Documentation.
9. If applicable, upload supporting documents by selecting the Select/Drag & Drop File to Upload option.
Relevant documents may include:
• Signed credit applications
• Financial statements
• Refurbishment cost sheets
• Invoices
• Other supporting files related to the credit request
Submitting the Application
• Once everything has been reviewed for accuracy, click the “Submit to Credit” button on the bottom right of the screen.
• A confirmation message will appear displaying your credit application number for reference.

Once in Accepted Status, if there are no changes needed, please refer to the Documentation & Takedown Section.
If changes are needed, please refer to the Amend section.
Manual Credit Application
Creating a New Customer Manual App:
Create Application
After you select Create Application, Select Request Type, you will select a customer type, New or Existing, to proceed.
Selecting Credit App

Selecting an Existing Customer:
• Type the customer’s name; matching records from your portfolio will appear.
• When searching for a customer, asterisks may be used as a wildcard. *al for Allied Welding, INC.
• Select the desired customer name with a correct Tax ID.
• Verify Existing Customer data, add or change as needed, and move forward to the Asset tab.
For a new customer select the New Customer button.

Steps to Create a New Customer:
1. Complete the required customer credit information fields. Mandatory fields will be coming soon.
• Fields marked with a red asterisk (*) are mandatory and must be filled out to proceed.
2. Enter the relevant customer information:
• For company, enter Legal business name, Tax ID, State of Incorporation and Business Type.
1. The TAX ID Field will not be editable until the address is filled out.
• For individuals, you will be required to enter their full legal name, date of birth and SSN.
• NOTES and TIPS: As designed you will need to ADD an address before you can enter the Tax ID.

Adding a Customer Address
Steps to adding Customer Address:
1. Click “Add” which opens the address screen. You can add both the main address and the billing address, or separate the Billing Address, if known.
2. For the application the Main address should be the company’s Registered Address.

3. If the Billing Address is different from the main address.
• Deselect the Main Address checkbox. Complete the main address and click “OK”.
• Add the billing address now by clicking, “ADD” new address and enter the billing address as needed.
• Adding a Billing Address is not required for application submittal.
4. Click OK and the added address should appear in the address section.

Selecting Finance Program:
Select your Finance Program.
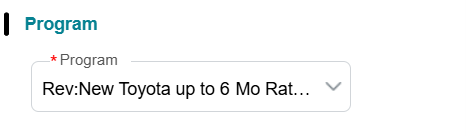
• Select the appropriate Finance program, such as New Toyota, Warehouse Products, etc. You can only select one Finance Program per Application from the dropdown menu.
• If you have two different program types, they must be submitted separately.
• Click Proceed button.
Proceeding to the Next Step
• Once you have made your finance program selection, click “Proceed” at the lower right of the screen to continue to the Guarantors & Co-Applicants section of the application.
![]()
Adding a New Guarantor
• You will add a new guarantor by clicking the “Add” button.
• Personal Guarantor Notes:
• Personal Guarantor – You will need to add an address prior to inputting the SSN.
• SSN Format: You will need to use 123-12-1234
• Check Business Type: Typically, individual would be selected.
• Date of B
• Select Address
• Cross Corporate Guarantor Notes:
• Personal Guarantor – You will need to add an address prior to inputting the Fed Tax ID.
• Tax ID Format: You will need to use the12-345678
• Complete State of Incorporation
• Credit Consent Date should be pulled down based on receipt date of authorization for credit
Scroll down to the Program Section.


Asset Tab – Manually Adding an Asset
Please tab through the fields on this page to add your assets.
• Fields marked with a red asterisk (*) are required and must be completed to proceed Click Add Asset Button.
• Asset Type will be your product, Ex: Class 1.
• Asset Condition Select New or Used.
• Asset Alias auto populates as a unique asset identifier. This is required so do not delete.
• Asset Description: This is a free form field and can be used to identify assets in the dealer portal. It does not link to the documents.
• Asset Catalog: This a pull-down list of models. You can also type in the model type and like models will appear.
• Model Year: This is free form and identifies the year and is required for residual calculations.
• Annual Hours is a required field, but Overage Rate is not.
• You need Annual hours listed for Loans and $1.00/$101.00. To mitigate customer confusion please add $0.00 for the Overage Rate.
• For Operating Leases/Residual utilize the expected hours.

• Operating Environment: Is defaulted to Clean and Dry. This is a pull-down menu for other conditions and is required for a residual.
• Dealer Cost: This is your dealer invoice cost. This number is used as the basis of a residual.
• Maintenance: Add maintenance fee for pass-through maintenance charges if TICF is billing. We will identify combined or split on the Funding Checklist.
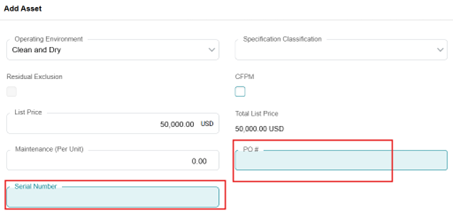
• Serial Number and PO: Not required at application stage but is required at Documentation. Please include Model-SN combination in the serial number field.
• Financed Amount: This is your all-in sales price.
• Quantity: Total of units
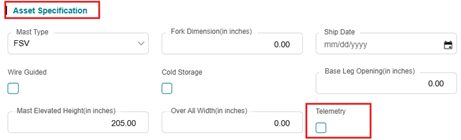
• Mast Type is a drop-down field.
• Mast Elevated Height (in inches) will be a manual input and are required for a residual.
• Equipment Location Address: Please use the Location Code pull down first. You can create a new location by checking the Create Location button. New locations will be approved by credit. Please recalculate the structure after approval to ensure correct tax application and payment accuracy.
Asset Views

• NOTES and TIPS – Equipment Location Address:
• The system works on codes for addresses. All first-time applications in the system will require you to update the address.
• Best Practice:
• 1st Time – Select Create Location.
• If new or the address does not show, select Create Location and complete the form.
• Going forward you will select a location address from the Location Code field.
• Click on the down arrow under the Location Code field. All addresses saved for this customer will be shown going forward.
NOTES and TIPS: If you do not select a location the tax will not show in pricing, and you will have to amend when you get to the documentation

Once all assets have been confirmed, click Proceed on the bottom right.

Review/Add/Modify Assets
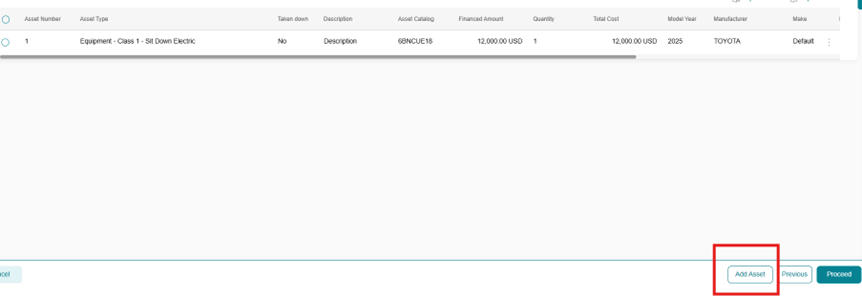
After clicking Proceed, you will be presented with a screen displaying the asset(s) you have added:

• Add more assets, click the Add Assets button at the bottom right.
• To modify or remove an asset, either double click within the asset box or use the pencil or click the three edit dots next to the asset line item on the far right.
• In addition, you can also Duplicate an existing asset.
• Duplication is a great way to split assets
• NOTES and TIPS: When you Duplicate an asset, you will need to update the Asset Alias.
• Best Practice: Asset Alias is required and needs to be unique. You will change the asset Alias by adding a letter to the current Alias.
• Ex: Alias is 59-39 change to 59-39A

• Telematics: If your lift has MyInsights Telematics please ensure that you are checking the Telemetry.
Note: Please note that MyInsights terms cannot exceed the financing terms of an operating lease.”
Notes and Tips: Maintenance Billing: You will note on the dealer funding checklist document, from funding, if maintenance will be combined or separately stated on the customer invoice. Please identify the customers’ preference, either combined or separate, on the checklist form.
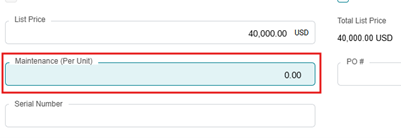
o Please note, there is no current combined Maintenance Field located within the Dealer Portal; hence, the request must be submitted utilizing the Funding Checklist.
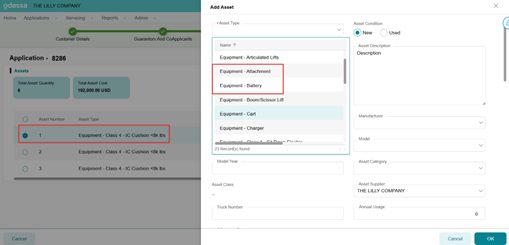
Adding Attachments/Battery/Charger – Setting Up a Parent/Child Relationship
Parent/Child is the new way to create the linkage between a lift and their attachments:
• You will add a child asset (e.g., battery, charger, attachments) to the parent by following these steps:
1. Click the Add Assets button at the bottom right.
2. Add your Asset Type and complete the Asset Catalog field, tab through to complete your remaining information of the new asset.
1. This is the same process as adding the parent asset.
2. Tips and Notes:
• Annual Usage and OT need to match parent asset
• Quantity: Please match the quantity needed. This may match the parent asset quantity.
• Ex: If you have 3 parent assets, you will input 3 in the child quantity so that you have 1 battery per unit.
• If you need 2 batteries per unit you will add a quantity of 6 so you have 2 batteries per unit.
![]()
• NOTE: Dealer Cost and Dealer Sales Price will be the same on the child asset as you are financing the total profit at the parent level.
3. At the bottom same dialog box, you will attach this child asset to the Parent Asset using the drop-down menu.
4. Select the appropriate Parent Asset from the equipment list and select OK to finalize the child asset relationship.
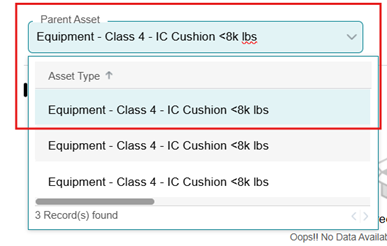
• By assigning a Parent Asset, the system will link the child asset to the main equipment, ensuring it remains part of the same structure and providing the appropriate residual.
Proceeding to the Next Step
• Once all assets have been reviewed and confirmed, click “Proceed” to continue to the next section, Structure section.

Structure Navigation Tab
• NOTES and TIPS: Each asset type must have its own structure within an application. Multiple assets are permitted (with same asset type) on the same application, but each unique asset type will need its own structure. For example, you can add New Toyota assets in the same application but not a New Toyota and Non-Toyota.

• If you have additional asset types, or different programs to include, you will need to create a new application. Please note, this can be performed in the Asset Tab.
Selection of Structure
• Build your structure
• One Asset: Follow instructions below.
• Multiple Assets: You can build individual structures for multiple assets. This will allow you to split assets at the application stage.
• Parent Child: Add additional assets, such as battery, chargers and attachments to the equipment. If you have a Serial Number please add it as it’s required for documentation.
• On the Asset tab, you link a battery, charger or attachment to the parent equipment. Select ADD Asset.
• The Add Asset screen will show, select the parent asset to link the attachment to the parent for structuring and residual.
• This is similar to adding an attachment

Building Structures
The Structure Tab allows you to review assets, enter deal structure details, and choose a Finance Structure.
Click the radio button for the asset that is being structured. Then select the following fields:
• Product Details select the relevant financing Product type (Residual, loan, $1.00 option, etc.).
• Structure: To price your deal you need to select the Number of Payments, Payment Frequency, Expected Funding Date. These dates are just for pricing.
• Expected Funding Date is required for pricing. Best Practice: is to default to the current date.
• For Pricing Due Day of the Month is required. Best Practice: This Due Day has to be the same day as the Expected Funding Day.
• Ex: Expected Funding Date is the 8/5/2025, then your Due Day is the 5th.
• First Payment Due Date: The day is also only used for pricing and is auto populated based on your Due Day.
• No. of Inception Payments: Leases default to 1 representing the first payment. There is no need to change this.
• Is Advanced: Leases default to Advance and Loans default to Arrears. You can select either structure.
• Down Payment is utilized when the customer has a down payment, this will be the total amount for the transaction, not the individual unit.
• Total Net Trade-In Amount If there is a Trade-In this will be the total amount for the transaction, not the individual unit.
• Calculation: Once your structure is completed you will need to Evaluate and Calculate to get your monthly payment.
Once all assets have been reviewed and confirmed, click “Proceed” to continue.
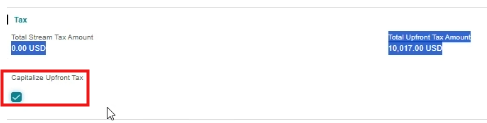
Tax Information
• Once a deal is structured with an approved location there are two tax fields that will show. Tax will only show if you have selected an approved location. You will see either tax on the payment stream or tax upfront based on the tax jurisdiction.
• Upfront Tax: If your tax is upfront, Capitalize Upfront Tax is defaulted to yes. This means the tax will be calculated in the transaction. Once Capitalized you will have to Evaluate and Calculate to reflect tax within the payment.
-
-
- If the customer does not elect to finance the upfront tax you will simply uncheck the Capitalize button.
- Tax Exempt Status: If a customer is tax exempt you will need to notify TICF. Please upload the tax exemption in the Funding Documents folder under the Document List slide out on the right hand side of the screen.
-
Structuring Multiple Assets
• You will need to identify that each Asset Type has its own structure (excluding Child as it is linked to the Parent asset). To split your structures by Asset Type you need to identify only one asset in the Assets Added section. To do that you will delete the Asset Types you are not structuring.
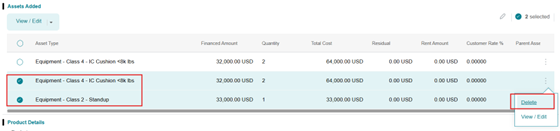
• Once deleted the Assets Added section will only show you the Asset Type you will be structure. Proceed to build your structure.
• Multiple Structures – Creating the structure for Additional Asset Types.
• With multiple assets you will continue to build your structures on the other assets by following the same instructions as above. Delete the assets already structured and follow the next instructions.
• Select Add New Structure
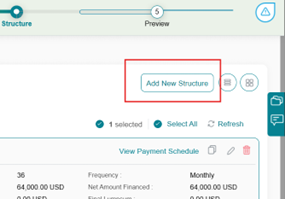
• Delete the other assets and proceed to build your additional structures for each asset following the previous instructions.

Fees and Charges – Adding within the Structure tab
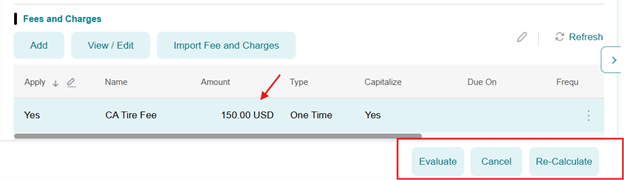
• At times you may have to add a Fee, such as Doc Fee, CA Tire Fee, Doc Stamp Tax. If you must add a fee you will have to add the fee and Evaluate and Recalculate your transaction as you are adding cost to the equipment.
• Select the Import Fees button is where you add any desired Document fees. Select the fee type and click Ok.
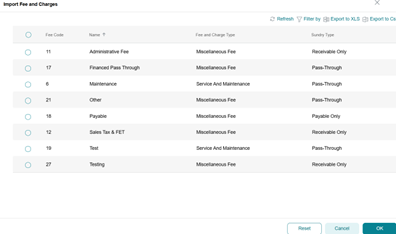
• This populates the Fee to the structure, but you will then need to double click on the Fee and populate the fee information.

• After all Fees and Amounts are populated, you will select Evaluate button and then the Re-Calculate and Add button to Calculate it into your payment.
• Delete a Fee:
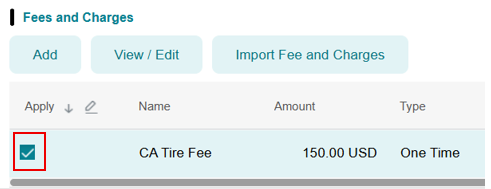
• If you would like to delete a fee you must hover over the Yes in Apply. That will turn into a check box, uncheck the box and click Evaluate and your fee will disappear.
Structure Page Navigation
• From the Structure page allows you to navigate through multiple structures: You can view multiple structures by selecting Proceed and you will have a preview of all structures.
• If you would like to view details within the structure, use the pencil to review and edit.

Edit or Changing the Residual
• You may need to match your payment quoted to the customer by entering a higher or lower residual than the Customer Expected Residual.
• Entering an amount higher than the program residual will yield a Dealer Guarantee and lower residual will increase the customer expected payment.

Structure Page Section – Additional Details
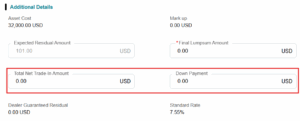
Down Payment and Trade In:
• In the Structure tab there is an Additional Details area. This includes Vendor Down Payment, Total Net Trade In and allows you to view Dealer Guarantee Residual if applicable.
• NOTE: The system uses Vendor Down Payment only for any applicable down payment for the transaction.

Purchase Option and Dealer Guarantee:
• Select the appropriate structure button. Then click View/Edit, or the three edit buttons the desired structure or select the pencil icon to edit.

NOTES and TIPS: If you change the Customer Expected Residual when you return to the main screen you will only click the recalculate button. Hitting the Evaluate button clears your Customer Expected Residual and mark up changes.
• Mark Up in the add asset section is not rate participation, this is only a dollar amount increase in your transaction.
• Buy Down Rates: If a Rate Buy down is desired, please to reach out to TICF credit via Service Request.
• Select Ok to lock in your changes

How to add Margin (aka Dealer Participation) on Non-Toyota and Used Equipment
• Margin is the new term for an interest rate Mark up or Dealer Participation.
• You can increase the Margin on a deal in the Application stage or Amend stage after approval within the Structure section. Best Practice is to add margin in the Amend stage when finalizing your deal for documentation.
• Add Margin is defaulted as active so you can tab to the next field and select the margin increase that you would like. Maximum of up to 2.5%.
• As stated before, with a Margin addition ONLY select the Calculate and Add button. Do not click on Evaluate. Evaluate resets the structure to the original rate. If you do select Evaluate just reinput your margin percentage and Calculate to bring it back.
• Verify the Rate has changed from standard to ensure that your margin is locked in the transaction.

Preview Tab
You can edit the asset information prior to the credit submittal.
• The last step is Preview page and allows you to review the structure before submitting the credit application. See below.
• Click Edit to allow editing, the Structure.
• Navigate using the button on the lower right if you need to go to a previous step.
Some changes, such as asset type, financing amount, will clear your current structure and force you to recalculate your structure.

Submitting the Application
• Once everything has been reviewed for accuracy, click the “Submit to Credit” button on the bottom right of the screen.
• A confirmation message will appear displaying your credit application number for reference.

Irregular-Variable Payment Schedule
Structure Page Section – Payment Details
The system provides flexibility to build non-standard variable payment schedules. This accommodates irregular payment schedules that support customers’ business needs.
The functionality is located within the Structure Tab as shown below.
• The Product Details Must be selected to allow editing.
• Select the Please deselect the Regular Payment Stream to invoke non-standard schedules.

Non-Standard and Variable Payment Schedules: For payments that are not monthly you can select Payment Frequency for Monthly, Quarterly, Semi-annually, Annually.
• NOTE: The Number of payments is based on the frequency.
• Ex: If using a 3-year term
• A Quarterly structure will be 12 payments, 4 per year, for 3 years.
• A semi-annual structure will consist of 6 payments, 2 per year, for 3 years.
• Annual structure will be 3 payments per year, for 3 years.

Additional Lease and Loan Structures
• You can build additional non-standard and variable structures
• Turn off Regular Payment Stream scroll down to the new section of Payment Details as shown below.

• Payment Details Section (below) will open additional options for Build Own Schedule, Irregular, Seasonal and Skip structure.

Build your Own Schedule: turn on the radio button. And click the hyperlink for “Build Schedule”.

• A Build Your Own Schedule Window Opens:
• Build your schedule is a flexible calculator that allows you to set known payments and calculate unknown payments for the desired terms.
• As designed, you will add 1 payment first, whether predetermined or calculated. For our example we are using $0.00. You may change this later.
• Click Add Button to Add the first payment.
• Your Remaining Payments will show in the lower left.
• From here you will build out your schedule.
• Example Below: Balloon Payment:
• Add the 1st payment
• Select remaining payments as calculated
• With the 1 remaining payment you can add your balloon amount in the Amount Field, in this case $5,000.00.
• Your structure is complete, and you will X (close the structure) out of this pop-up schedule box back to the main structure screen which you need to click on Evaluate and Recalculate the schedule you created.
• Your new payment will be shown in the structure box on the right.
• You can verify your custom schedule by clicking Proceed and View Payment Schedule.


• Calculate: Finalize the structure by closing this screen. Then proceed to Evaluate and Calculate the structure and the new payment will show in your structure.


Deferrals – Upfront:
• There is a deferral field that you can complete for the amount of deferred or skip payments a customer wants at the beginning of the lease. Evaluate and Recalculate and your new structure will show.

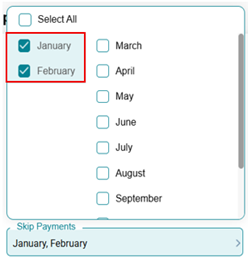
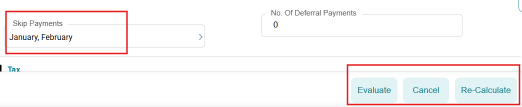
Seasonal Skip Payments:
• Select the arrow in the Skip Payments field and you will receive a chart of the month’s that you would like to skip.
• After selecting the skipped months, you will Evaluate and Calculate to view the schedule of payments.

Escalated Payments: Are possible in the Dealer Portal and refer to escalating payments in percentage increments over the term of the lease.
See the schedule below for reference.
• Select the Escalated Payments button and add the Escalated Percentage and Escalated Period desired as shown below.
• Once completed for the full term, you can view and print or download the actual schedule by clicking on Export to XLS or Export to CSV.
• Note: An error may appear when exporting or downloading data from the Dealer Portal using Export to XLS or Export to CSV. Depending on your browser, you may need to adjust your download settings or contact your Dealership’s IT department.


In the center of the Structure Tab, you will see the Additional Details section. Here you can add a downpayment or other structure details.
When completed, click the Evaluate Button and then Recalculate Button.
Additional Details:
On the right side of the screen, a preview of your structure is displayed.
This provides the ability to Modify and Remove the Structure:
• Modify the structure by clicking the Edit icon on the structure line.
• Remove the structure by clicking the Trash Can icon.

If you modify a structure, you must click “Evaluate” and then “Re-Calculate” before proceeding.
Once all structures are completed, click “View Structures” at the bottom right of the screen which will return you to the Structure screen.
Amending a Credit Application
Using the Dealer Portal, you can request to Amend the application. The Amend function is for changes and additions to your deal transaction and can be used for the following scenarios:
• Credit Request – Application without Assets and Structures: This feature enables users to create an application and request a dollar amount without entering details of all the Assets. You will Amend an application to add Asset equipment details and structures after Approval.
• Application Amendment for Multiple Schedule: Multiple schedule structures apply to Leases only use Amend to add new assets and structures for multiple truck deals.
• Amendment of Deal Request (Credit Application): Originators can now amend applications post credit approval modifying assets, structures, and other financial or non-financial details during. Based on credit re-decision logic, risk-increasing changes will require re-evaluation, while others can proceed with standard review, document generation, and funding workflows.
Amend the Credit Application
Navigate to the Amend Function from the three edit dots on the Accepted Application from the Home Screen.
You will see this in your Home Screen view when searching for the Application to Amend.
• Click on the three edit dots on the application line to pull up your menu.

• Amend: To Amend an Application the Status must be in be in Accepted Status. If there are additional changes to your lease/loan you may need to use the Amend function.
• Amendments are required in cases as described below and can be found in the
Asset Tab and in the Structure:
Guarantor Tab:
• Add/Remove Third Party Guarantors
Asset Tab:
• Amount Financed
• Adding a new address not listed in the customer record.
• Rate margin increase (Dealer Participation).
• Structural changes to the lease or loan.
• Some of these items may require credit review.
• Annual Usage
• Operating Environment
• Maintenance
• Location Address Change
• Mass Type
• Mass Elevated Height
Structure Tab:
• Structure-
• Products (Loan, FLEX, Residual, etc.)
• Number of Payments
• Payment Frequency, etc.
• Expected Funding Date
• Due Date of the Month
• First Payment Due Date
• Down Payment
• Customer Expected Residual (Within the Asset of the Structure Tab)
• It is important to ONLY click the Re-Calculate Button. If Evaluate is clicked asset will revert back to the original customer expected residual.
• Margin %/Mark Up (Within the Asset of the Structure Tab. It is important to ONLY click the Re-Calculate Button.)
NOTE: The Amend Function will not allow you to edit the following. Solution: If you have a change from the list below, please submit a Service Ticket through the portal. That will be logged into the queue and credit will assist in making the necessary changes.
• Asset Type
• Add or Delete Asset
• Asset Catalog
• Manufacturer
• Make, Model, Model Year
• Quantity (add or decrease)
Amend Changes – Margin Increase or Mark Up Used or Non-Toyota:
• There are two ways to increase the yield on your deal for Used equipment and Non-Toyota.
• Margin: Margin is the new terminology for a rate increase for dealer participation.
• Mark up: This is only a dollar amount increase in your transaction.


• Amend Change Recalculate Button – PLEASE NOTE: To update the payment if you change the Customer Expected Residual or Mark Up/Margin, when you return to the main screen you will only click the Recalculate button.

• Although tempting, please do not select Evaluate. Selecting the Evaluate button will revert the deal to the prior structure.
• If there is an error, the solution is to re-do the Amendments you made, return to the main screen and only Recalculate.
• Amend Changes Complete: Once you make your changes you will Proceed through and Submit to Credit.
• Return to the home page and refresh your screen. Asset should reflect as Submitted.
• If you increased the Amount Financed or changed the asset the application may reflect in a Pending Status. Credit will have to review these items.
Amend Change Residual
• If you need to change your residual during Amend follow the process below.
• You may enter a higher/lower residual than the Customer Expected Residual.
• Entering an amount higher than the program residual will yield a dealer guarantee and an amount lower will increase the customer’s expected payment.
• Click Recalculate.
NOTE: If you change the Customer Expected Residual, when you return to the main screen you will only click the recalculate button. Hitting the evaluate button will reset to the previous structure.

• Amend Changes Complete: Once you make your changes you will proceed through and Submit to Credit to move the changes into our core system for documentation.
• Return to the home page and refresh your screen.
• Asset should reflect as Accepted if there was no material change to the Amend request such as credit risk factors.
• If you increased the finance amount or changed the asset the app may say Pending. If Pending, our Credit team has a queue and they will be reviewing these Amend Changes after you submit.
Once credit approves you can proceed to Final Review to from the Home Scree by clicking the three edit dots to create Contract Documentation and Initiate Takedown.
Lease/Loan Documentation and Takedown:
Application Search:
• Once you are ready to create documents from the Dealer Portal Dashboard Home Screen you can search for your application several ways.
• Sort by Customer Name, Date Submitted or in the Application section, Click Filter to search for the Application.
• You can filter by Application #, Customer Name, etc. then click Apply.

Final Review:
• The Final Review process allows you to review and update key deal information prior to Documentation. Select Final Review using the three edit dots, select Final Review and this will take you into deal summary page.
• Changes: If there are changes that need to be made to the deal, please refer to the Amend section.
• Within the Final Review summary page, you can double-click on the asset, and a pop-up page will show, allowing you to edit the following items:
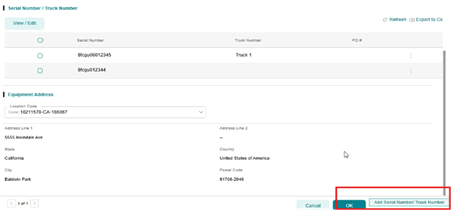
• ADD or update the Serial Numbers/VIN and Purchase Order Number
• Serial Number: If you have multiple assets, you will see a slightly different screen.
• Multiple Asset View
Note: If you do not see the field as editable in Final Review, please perform the Amend Function. For instance, not all fields are editable in the Final Review stage and will require an Amend Function, please see the Amend section on the Dealer Training Center.
• Location Verification:
• If the location is correct from the application, you can proceed
• After approval of a new location please verify the location and tax status and recalculate to ensure you capture possible Upfront Tax.
• From the Location Code field select an address from the customer record.
• If there is a new address, then you will need to Proceed to the Amend process.
• Summary Page: Click Ok to move back to the summary page.
• Key Step: Once the Final Review is completed select Save.
• This is important to save the structure and serial number information in the system enabling you to create the documents with the correct information.
• Do not click on Initiate Takedown in the bottom right. This is the absolute final step to submit documents when ready for funding.
Documentation for Lease/Loan
The application must be in Accepted status to create Documents.
For Contract Documentation, find the Application in the Home Screen, use the three dots to go to Final Review shown below:

• Ready for Documentation: This is your first step to start the document setup process. In your Summary page scroll down to the Structure section.
• Select the Structure you want to Document
• Click No, once No is clicked, a box will appear, check the box and it will change to Yes.

Note: It is important to note that Ready for Documentation must reflect Yes in order to proceed with Initiate Takedown.
Selecting your Structure:
• Takedown Option: Then select a desired structure or multiple structures for documentation by clicking the radio button in the upper right of the desired structures.
• Single Structure: If all assets are the same, delivery date and/or location are the same.
• Multiple Structure: If you are splitting assets, due to different delivery dates or separate locations, you will use the Multiple Structure pull down.

Multiple Structure Schedules:
• To split units for different schedules. In the Takedown Option Field, you will be able to select Multiple Schedule to split assets by schedule. Please note that once units are split you cannot recombine them.

• Once Multiple Schedules are selected you will need to Select the assets that you want to split by choosing the Select Assets button.

Select Assets: This will take the view to another screen.
• Takedown Quantity: Identify the units you are separating. There are 3 ways to complete this.
• You will hover over the Takedown Quantity and the field becomes editable.
• You can click on the pencil next to Takedown Quantity
• Or utilize the View/Edit Button
• Mass Update: Navigate to the Mass Update button to pull in all assets.
• All assets will show allowing you to choose the units to split.
• You can only Update assets with Serial Numbers.
• Add to Takedown: The last step is to hover over the Add to Takedown radio button and check it to add the selected unit(s) for documentation and click OK.

• If there are multiple assets, it may be easier to Select the Asset Type and use the Mass Update Button. This takes you to another pop-up box, where you can select all items more quickly.

• Select OK to move back to the summary screen.
• Viewing split assets: Once complete you will see two (or multiple) Takedown’s that will be available for documentation.
o Follow the documentation process below.

• Click the Save button. Now your assets are ready for you to view, send and save the documents.
• Document: To produce your documents. On the right side of your screen there is a Slide out Menu, select Document List and a pop-up screen will appear with all the required documents for your selected structure.

• Document List: From the document list you will click on the radio button to select the documents you want to produce for this transaction.
• You can create single documents or multiple documents as needed.
• Multiple Documents: How to Merge Documents – Generate and Pack:
• As you will likely have multiple documents there is a document merge function called Generate and Pack.
• After your selection of multiple documents, at the bottom menu Select the Generate and Pack button to group your documents together.
• A pop up screen labeled Generate Pack appears. This has a field allowing you to name your merged packet.

• Click OK and you will return to the main document screen.
• Important Note – Submit: In the bottom right you must select the Submit button to save your documents for the deal. If you do not submit it does not import the application data to your lease or loan documents.

NOTE: If your document line shows as Pending, it means documents have not been Generated. If it shows as Generated, it means documents have been created. Follow the documentation steps above if docs are not generated.
• View your Documents:
• From the Document List Menu. Select the Document Packages Tab. This will show the Packets you created.
• Double click on the Packet Name you need to view the PDF of your documents for accuracy.


Document Production for customer execution:
• There are multiple ways to send documents to your customers.
• PDF: Print or email the PDF document to your sales team or customer directly.
• Dealer DocuSign: Insert the PDF into your own DocuSign/ESign programs to package lease/loan documents with the relevant dealer documents.
• Integrated DocuSign: The Dealer Portal is linked to DocuSign, allowing you to use the internal DocuSign feature.
• Esign:
• Use the E-Sign Envelopes tab to invoke DocuSign.
• Select Add Envelope
• Note: If this is a new customer, a contact will need to be set up to receive DocuSign.


Once you click Add Envelope another screen will open as shown below:
• Add Subject and Message as needed for the email.
• Attach documents in the ESign Attachments section, click Import

• Import Attachments allows you to select your packet for DocuSign. A screen will pop up showing several Documents.
• Select the packet created for this transaction. It may be near the bottom.
• Click the OK button to link the Packet to DocuSign.

• ESign Recipient: After adding the document Packet proceed to the Esign Recipient section to add contacts for signatures or viewing.
• Select Import Recipients to add a signer or viewer.

• Import Recipients: A pop up screen labeled Import Recipients will list the customer contacts. Choose the person that will be executing the documents for the customer and the dealership Click Ok
• NOTE: If a Contact is not listed on customer record a Service Request will need to be submitted before DocuSign can be sent so that TICF can add the customer contact to the customer record.
• Editing Recipients Information: If the customer who needs to sign the documents is not listed in your recipient list, there are two ways to update the information.
• Edit in Place: Columns with a pencil icon can be edited directly.
• View/ Edit Button: Use the View/ Edit button to open a separate page where you can update all recipients details at once.


• Other Edit Functions: Within the E-Sign Recipient section you can also
• Set Signature Order: Choose the hierarchy in which the customers will sign the documents.
• Select Action Type: Decide whether a customer will sign the documents or receive a copy only.
• After completing these items Select OK to proceed.

• Verify that all of your information or edits are correct.
• Select the Document Packet, use the radio button next to the correct packet.
• Send Envelope: Click Send Envelope at the bottom of the screen.

• Complete in Docusign: The system will redirect you to Docusign. Within Docusign, add the required fields (signatures, titles and dates) in the appropriate areas of each document.
Funding – Submitting your Funding Package and Takedown
Once your equipment is delivered and you have all executed and supporting documents ready for upload follow these steps to submit your funding package and complete the Takedown process.
• Gather all required documents:
• Make sure you have all executed documents either physical or via DocuSign and all supporting documents (Dealer invoices, Funding Checklist, etc.)
• If using Odessa DocuSign: Executed documents will automatically return to the system.
• You will still upload any relevant supporting documents following the process below.
• If using External Docusign or physical documents you must manually upload these into the system as follows.
• Upload your Funding Package:
• Go to the Document List on the right hand side of screen.
• Scroll to the bottom of the list to the Funding Package item.
• Right click on Funding Package and Select View/Edit.
• A secondary screen will appear allowing you to add documents. Drag and Drop your documents into the upload area.
• Once all documents are uploaded, click OK and return to the main Document List screen
• Submit the Package: Select Submit This is a crucial step to ensure that you have saved your uploaded documents to the system.


• Once all executed documents are uploaded and everything is finalized you will commence the Initiate and Complete Takedown process. This process moves the documents to our Funding team to commence the deal.
Initiate and Complete Take Down Process
Use this step only when you know that the package is ready for funding. This locks the deal into the system and limits changes in the Dealer Portal.
• The final 2 steps to send the documents to the Funding Department are Initiate Takedown and Complete Takedown.

• Select Final Review and in the Structure section locate the Takedown line.
• Hover over or click on the “No” checkbox – a box will appear for you to check.
• This changes the Takedown status from No to Yes
• Select Initiate Takedown in the bottom right.
• A slide in panel will reflect the Takedown is Initiated successfully.
• Contract Number: When you close the takedown box, you will now see that the lease/loan has a contract number.


Complete the Takedown Process
• At the Homepage you will begin the Complete Takedown process.
• View Application and find the application number you are ready to complete.
• Right click on the Application line or use the three edit buttons on the right to select Takedown.

• Once Takedown is executed your deal structure will show on the screen. Using the three-edit button select Resume Takedown Structure.

• The summary page will appear, and you will select Complete Takedown for this transaction.

• Initially the status will reflect Takedown Initiated. If you select Refresh you will see a change in status to Takedown Completed.


Note: To confirm the contract has been commenced:
• Click on Servicing
• Click on Contracts
• Click View Contracts
• The contract status will reflect Commenced as shown below


Held Deal:
If you have a Held Transaction for which the funding team needs additional documentation (updated invoice, correction letter, etc.), you can easily add any supplemental documents within the TICF Dealer Portal. The upload process is the same as the funding document upload.
• Find your application that needs documents on the Homepage and use the three edit buttons to select Final Review.
• You will get a pop-up stating that the deal is locked in Takedown mode.
• Select OK for read-only mode.
• Return to the Document List Menu and select the Funding Package.

• Click View/Edit and your Document screen will appear allowing you to add needed attachments via Drag and Drop. You can add a description as well using the pencil to edit that line.
• Select Ok to return to the main summary screen.
• Click Submit to send the documents to the funding team. This is a crucial step to ensure that we receive the documents.
• Documents will now be back in a queue for funding.

Key Differences & Key Terms to Know
Key Differences between TC3 and the NEW TICF Dealer Portal
This section highlights key differences between TICF’s old system, TC3, and our new Dealer Portal. If you currently use or are familiar with TC3, this section below will be helpful for you to know what processes will be slightly different in our new system.
Application Submittal: You won’t see a credit analyst listed on your transaction anymore. The new Dealer Portal utilizes a queue system for credit decisions, which is expected to enhance consistency. You will still have access to your credit analyst, and we will continue to share TICF contact lists with you so that you can reach us with any questions or concerns. Always feel free to email or call your current analyst.
Applications by Program: Applications must be submitted by program type. TC3 allowed mixed assets, but the Dealer Portal requires separation. While this adds steps, it aligns with document processing.
Buydowns: In the new Dealer Portal, buydowns are no longer an available option. Instead, dealers must request them from the credit team.
Billing Lead Time: The invoice lead time has been reduced from 25 to 17 days to improve late charge billing. This change is system-driven and helps streamline operations.
Credit Decision Notifications: All dealership contacts listed for Originations will now receive approval/decline emails, not just the submitter. This is a new feature in the Dealer Portal. You can submit a Service Request to update email addresses.
Equipment Schedule: MLA Date: The new Dealer Portal doesn’t have a field for the Master Lease Agreement (MLA) date, which TC3 did have a field for. In the new Dealer Portal, you will need to manually add it using DocuSign or handwritten. We are actively working on this issue as a future enhancement post-launch.
Funding Remittance Document: The new ACH remittance form in the Dealer Portal is less detailed currently and includes VIN/SN and manufacturer info. However, the form does not contain customer names or markup breakdowns. We are actively working on this issue as a future enhancement post-launch.
Flex Lease: The Flex Lease must be submitted to the funding team as a Service Request via the Dealer Portal service request, where TICF will manually create the Flex Lease Rider.
Lease Payoffs: The payoff process shown in the training sessions has been delayed. You will continue to request payoffs via the Customer Service email address ticf_cs_sm@toyotacf.com.
Loan Contracts – Multiple Units: The new Dealer Portal allows submittal of multiple units on an application, but you can only have one unit per loan contract. If needed, TICF funding can manually create a multi-unit loan contract. Contact funding for assistance.
Master Lease Creation: Master Lease creation is now handled at the funding stage using the Dealer Portal’s Master Agreement module. This change centralizes MLA info at the customer level and simplifies tracking.
Migrated Data: All approved applications from the past six months have been migrated from TC3 to the new Dealer Portal; however, some will require updates, recalculation or resubmission. Please double-check your deals to ensure accuracy.
New Location Approval and Upfront Tax: All new locations must be approved for correct tax treatment before contracting. If you add a new address during after approval, use the Amend process so credit can approve the location. To capture the upfront tax in a transaction on an approved location you will need to recalculate to have the tax included and reflect on payments. Upfront tax is defaulted to be capitalized in the transaction.
Service Requests: Dealers will now use Service Requests for changes, questions, and asset additions. This replaces email-based requests, allowing for the tracking of status and timing.
TICF to Remit Tax: For lease contracts with upfront taxes, TICF will remit taxes, and dealers can no longer choose to remit. This removes dealer liability for tax compliance.
Splitting Structure: Splitting structures works differently in the Dealer Portal. Once split, units can’t be rejoined. If a customer has to have all units together a new application may be needed.
Key Terms to Know
Pull Application – This is the EZ Button function, pulling the Opportunity number and Sort ID into the Dealer Portal system.
Deal Request – is the process of creating an application with a new customer or a customer without a Line of Credit.
Credit Request – is the process of requesting a Line of Credit for an existing customer.
Program – is the pricing program utilized to define the interest rate or other special promotions.
Guarantors or Co-Applicants – are the Personal or Corporate Guarantors on file for a customer.
Asset Alias – is a unique identifying number for each individual asset in our portfolio.
Product – is the specific lease or loan type sold to the customer.
Payment Frequency – is the stated frequency of expected customer payments.
No. of Deferral Payments – is used for payment deferrals added to the front of the lease.
Due Date – is the date the customer’s payment will be due for each billing cycle.
No. of Inception Payments – Is the number of advance payments. The system defaults on the inception period of ‘1’ for leases because the first payment is typically due at the beginning of the lease term. For loans, however, the inception period should be ‘0’ since payments generally begin after funding.
Asset Alias – Alias is an alternate name given to the asset for identification, which also serves as a secondary search option
Asset Catalog – Refers to the Asset Model Number 8FGU25, for example.
Takedown – The process of reviewing the finalized lease packet and submitting it to TICF.
Down Payment – is any amount the customer is adding to the front of the lease.
Final Lumpsum Amount – is a payment made at the end of the lease as a balloon payment.
Inactive Leases – are paid off leases with zero dues or terminated contracts.
General Operations
Name Change – Entity keeping same Fed Tax but legal name has changed.
Transfer / Assumption – Different Fed Tax ID’s between transferee/ Transferor.
Dealer Portal Status Types
To help you understand the most common status types, please reference these definitions:
- Submitted – your application is in the queue waiting for credit.
- Dedupe Completed – the application and customer details are being validated. No action required by the dealer.
- Legal Name Verification Completed – No action required by the dealer.
- OFAC Screening Completed – the application is being validated. No action required by the dealer review.
- Incomplete – the application is in process by the dealer and has not been submitted to credit.
- The dealer needs to complete the submittal to move out of this status.
- OR the application has been returned to the dealer by Credit for additional information, please resume capture application and review comments for additional Credit needs/requirements.
- Revise – the dealer is “revising” or updating the already submitted and approved application. The dealer needs to complete the revision to move out of this status.
- Accepted – the application is approved and now the dealer can proceed with generating their documents.
Contact Us
We welcome feedback on items to add or improve in this training site.
Don’t ever hesitate to get in touch with us for any questions or concerns: ForkliftDealerPortal